
Maxkgo 5-12S 120A ESC: Installation Guide & First Impressions
, Von COMPANYMAXKGO, 3 min Lesezeit
, Von COMPANYMAXKGO, 3 min Lesezeit
Building a powerful and reliable multirotor starts with choosing the right components. At the heart of your drone's powertrain is the Electronic Speed Controller (ESC), and for demanding 12S setups, you need one that can handle the current and voltage with precision. In this guide, we walk through the installation and key features of the Maxkgo 5-12S 120A ESC – a compact powerhouse designed for serious builders.
Product Overview: The Maxkgo 5-12S 120A ESC
This ESC is built for pilots who push the limits. Its specifications lay a solid foundation for high-performance applications:
Voltage Range: DC 18V - 50.4V, supporting 5S to 12S LiPo batteries. This wide range offers incredible flexibility, from aggressive 6S freestyle builds to efficient high-voltage 12S platforms for heavy lifting or long-range flight.
Current Handling: A robust 120A continuous current with a 150A burst rating ensures stable power delivery even under the high demands of large props and high-torque motors.
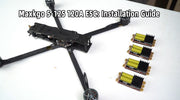
Form Factor: As seen in the images, it features a compact design that fits neatly into tight builds, with clearly labeled solder pads for clean wiring.
The Maxkgo 5-12S 120A ESC (we recommend one for each motor).
Brushless Motors compatible with your target voltage and thrust requirements.
A Flight Controller (FC) of your choice.
A Power Distribution Board (PDB) or a flight controller with an integrated PDB.
Essential tools: a quality soldering iron, lead-free solder, flux, heat shrink tubing, and a multimeter.
Step 1: Prepare the ESC
Solder your motor wires to the three motor phase pads on the ESC. The order isn't critical initially and can be corrected later in software by swapping any two wires.
Solder a short, heavy-gauge wire from the B- pad to the corresponding negative pad on your PDB.
Solder a wire from the B+ pad to the positive pad on your PDB.
Solder a signal wire to the Tx pad. This wire will carry the DShot signal from your flight controller.
Step 2: Integrate into the Frame
Plan the layout. The ESC can be mounted on the arm or stacked in the center, depending on your frame design. Use double-sided tape or a zip tie with an insulating pad to secure it.
Crucial: Ensure the metal backplate of the ESC does not short against any carbon fiber parts. The ESC housing itself is insulated, but it is recommended to wrap an additional layer of tape around the frame for insulation.
Step 3: Wiring to Flight Controller
Connect the ESC data return line (Tx) to the dedicated pad on the flight controller.
Connect the ground wire (GND) from the ESC to a ground pad on the flight controller. This ensures a common reference voltage for clean signal communication.
Route all wires neatly and secure them with zip ties to avoid interference with moving parts.
Step 4: Power Distribution
Solder your main battery leads (XT90) to the primary positive and negative inputs on your PDB.

Conclusion
The Maxkgo 5-12S 120A ESC presents itself as a serious contender for builders seeking a reliable, high-current ESC for demanding applications. Its straightforward design, clear labeling, and robust specs make the installation process logical for experienced DIYers. While it requires the standard care and configuration of any high-performance AM32-based ESC, its potential for smooth, powerful control in 12S setups is clear.
Ready to power your next build? You can find more
Please follow our social media for more info, thanks.
YouTube: https://www.youtube.com/@MAXKGO
Instagram: https://www.instagram.com/maxkgo_tech/
Facebook: https://www.facebook.com/Maxkgo?locale=zh_CN


